How to Access Inside Ice Machine Components
You may want to access the inside of your commercial ice equipment. You may even want to learn how to take apart your ice maker to clean it, to try to fix it, or just because you're curious about what it looks like inside. What you should know is that many calls The Ice Machine experts receive on our 24/7 customer service line sound a lot like this: "I thought I would take apart my ice maker to <insert reason>, and now it's not producing ice." This happens far more often than you might expect. And it can lead to more expensive repairs than if the ice machine owner would have left the unit alone and instead, called a professional ice machine technician. We recommend leaving trouble shooting, ice machine repairs, and even deep cleaning to trained ice machine techs. However, we know that some business owners will choose to perform their own ice maker deep cleans. To help them do it properly and to prevent potential damage, we wrote three brand-specific guides to descaling, disinfecting, and sanitizing ice machines:
- Hoshizaki Ice Machine Cleaning Guide
- Manitowoc Ice Machine Cleaning Instructions
- Scotsman Ice Machine Cleaning
In each piece above, you'll find critical, high-level information regarding how to conduct an ice machine deep clean safely and effectively. Inthis blog, we've supplied more specific instructions for how to access the interior of the ice maker. Use the instructions below to access inside ice maker components when performing a biannual ice machine deep cleaning.
Tools
You will need a screwdriver to access the inside of the ice machine. The type you need depends on the ice machine make and model and whether manufacturer-issued screws have been lost and replaced with non-factory screws. You will almost certainly be able to unscrew the necessary panels with one of the following screwdrivers:
- Phillips
- Straight bit
- 1/4 nut driver
- 5/16 nut driver
Removing Panels of Most Ice Machines
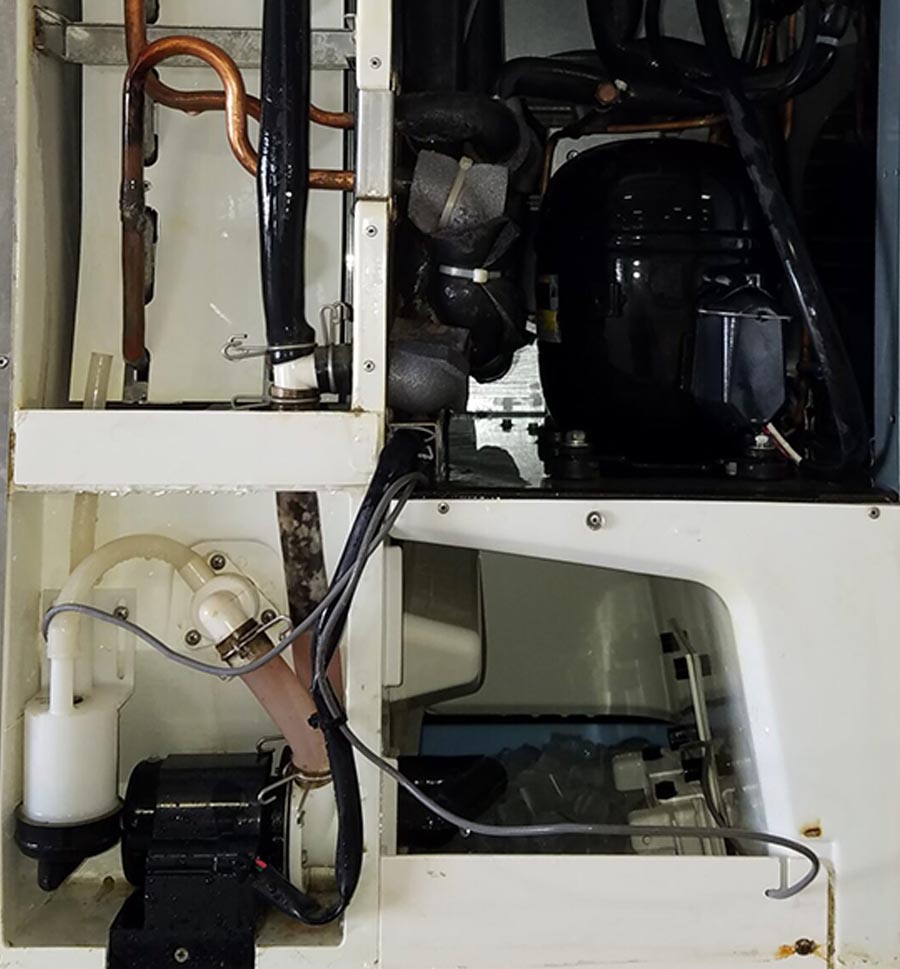
The first thing to assess is whether your ice storage bin is part of the machine (all-in-one) or a separate piece. If the ice machine and ice bin are separate pieces, you may remove panels per the instructions in this section. If your ice machine and its ice storage bin are all one unit, refer to the next section about all-in-one ice makers. Use your screwdriver(s) to remove the screw(s) that affix the front panel to the chassis. This is always the first step. There might be one to four screws, depending on your ice machine manufacturer and model. Next, remove the top panel, which will then give you the ability to remove any side panels. Some machines will not allow both side panels to be removed due to being pop riveted in place. Remove any side panels that simply unscrew. Do not attempt to remove a side panel that is riveted to the ice machine. No further panels need to be removed to access any of the following food contact surfaces:
- Ice making section, including the evaporator case
- Water circuit
- Water reservoir or sumps
- Drop zone
There is no componentry under the machine; however, it is an area that needs to be accessed during a deep clean in order to thoroughly disinfect and sanitize the entire ice machine. In modular units, you would open the storage bin door and remove the baffle. A baffle is a diverter that directs ice to the back of the machine, so ice doesn't build up at the front and spill out when the door is opened. Baffles are generally held in place by thumb screws that can be unscrewed by hand or regular screws. This is not technically an interior ice machine component; however, it is an important part to address when performing a deep clean.
Accessing the Inside of All-in-One Ice Machines
All-in-one units (also called combination units) may have different methods of accessing the interior components. These are most often installed under the counter and may be referred to as "undercounter," but they may also be freestanding. Generally, most components are front-accessible or top-accessible, but refer to the instruction manual for specific details on how to access the inside of your all-in-one ice machine. There are two kinds of interior components: food contact surfaces and refrigeration components.
- Food contact surfaces are those that need to be accessed for the purpose of deep cleaning. You can typically access the food contact surfaces through the storage bin door or by removing the machine's top panel." The exception to this is Hoshizaki all-in-one units with greater than 160-pound production. These larger ice machines require you to remove the front cover.
- Refrigeration components may be accessed behind the front louvers, which can be unscrewed to remove. The exception here is the Manitowoc NEO series, which require the storage bin to be removed.
Examples of brand-specific all-in-one ice machines include (but are not limited to):
Manitowoc Ice Making Machines
- NEO series
Hoshizaki Ice Makers
- KM(B) Series: The (B) indicates that they have built-in ice storage
Scotsman Ice Machines
- Any model names that contain UC, CU, UN, or UF: The "U" indicates undercounter style units
Undercounter Ice Machine Access
If the machine is installed under a counter, this clearly presents an obstacle to accessing inside ice maker parts by removing a front or top panel. In this case, an experienced ice machine technician might need to de-install the unit in order to gain full access. We do not recommend attempting this yourself, no matter how badly you want to take apart your ice machine or DIY repair it.
Barriers to Accessing the Components of an Ice Machine
Our team of Ice Machine Experts have developed proprietary, industry-leading protocols that include a required minimum space around the ice machine for accessibility and ventilation. We call them our DEWS. Unfortunately, not all ice machine installers are aware of such requirements nor do all take them seriously. Thus, some ice machine locations or environments limit or prevent accessibility, making it difficult or impossible to access the inside of the ice maker.
Factors that limit ice machine accessibility:
Two ice machines stacked on top of one another (just because you can doesn't mean you should) Ice machines installed in cubby holes or a too-small closet Items stacked on top of an ice machine (the top of an ice machine is NOT a storage space) or leaning or stacked against the sides Ice machines installed too close to the ceiling Please note: environments that cause poor ice machine accessibility also usually limit the ice machine's ventilation. Air flow is a critical requirement for an ice machine to continue optimal production. We have seen ice machines installed into closets that are barely large enough to accommodate the unit, let alone to allow for proper air flow. Lack of ventilation stresses the refrigeration system, which ultimately shortens the life of the ice maker. These closets are akin to ice machine "coffins," and we encourage business owners to remedy such environments.
Leave Behind Your Ice Machine Troubles (and Troubleshooting!)
The beautiful thing about an Easy Ice Subscription ? Customers don't have to worry about ice maker service, cleaning, or repairs, because we handle it all. For one low monthly rate, our customers get an ice machine from a leading brand and all the support necessary to ensure their ice supply.
The Advantage Is Clear: Clean. Reliable. Easy Ice.
Talk to our team about a fully managed subscription for your operation.